Creative Photoshop Animal King Photo Manipulation Tutorial
 22:27
22:27
 hatizix

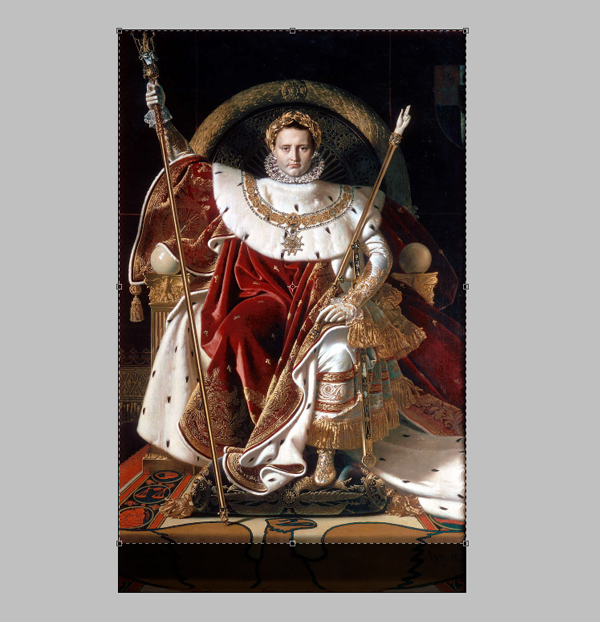
Step 1: Open the Napoleon image & Crop it
First of all open the painting of Napoleon. It is a famous painting done in 1806 and it can be used as it’s copyright has expired and it is now in the public domain. It was found it on Wikimedia Commonswhich is a good site for such images.
Use the Crop Tool (C) to crop the steps off the bottom of the image to improve the compostion and bring more attention to the head.
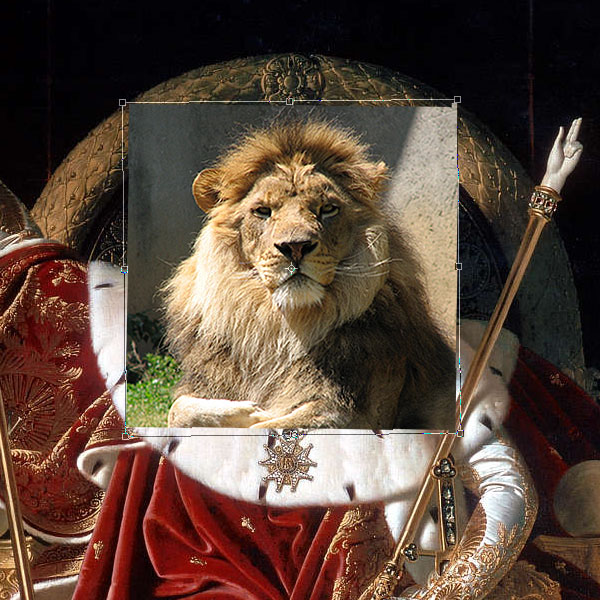
Step 2: Add Lions Head
Import the image “Male Lion". Using Free Transform (Ctrl +T) resize the image and rotate it slighty so that it fits well on the body
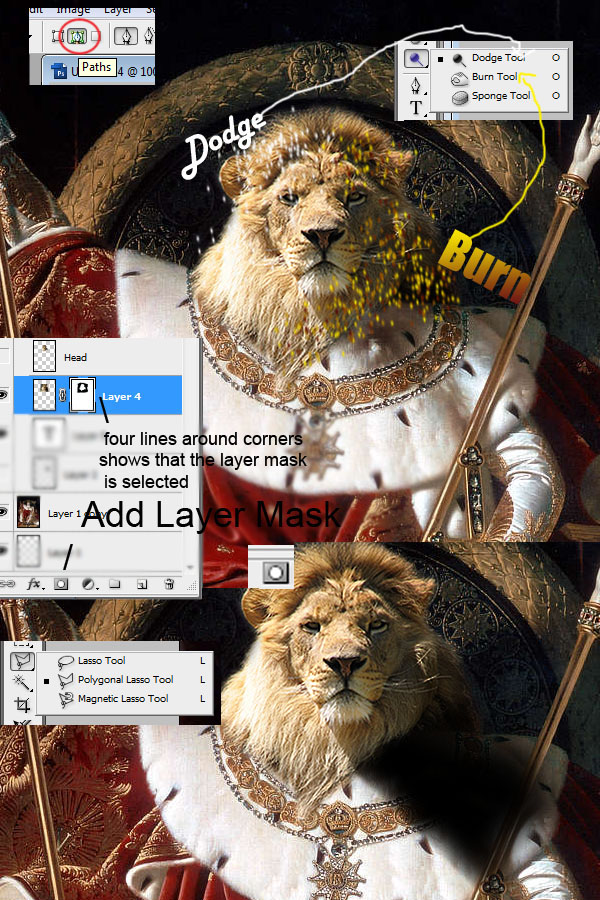
Step 3: Blend lion head into body
Add a layermask to the layer with the lion’s head either by Layer > Layer Mask > Reval All or by clicking on the Add layer mask icon on the Layers window. You can paint in greyscale in the layer mask. Using a black brush hides the image at the corresponding position on the layer while a white brush will reveal it. Different shades of grey can be used for different opacities. Use a Soft Black Brusharound the lions head on the layer mask to hide the surrounding scenery. You can use the ] to increase brush size and [ to decrease brush size.
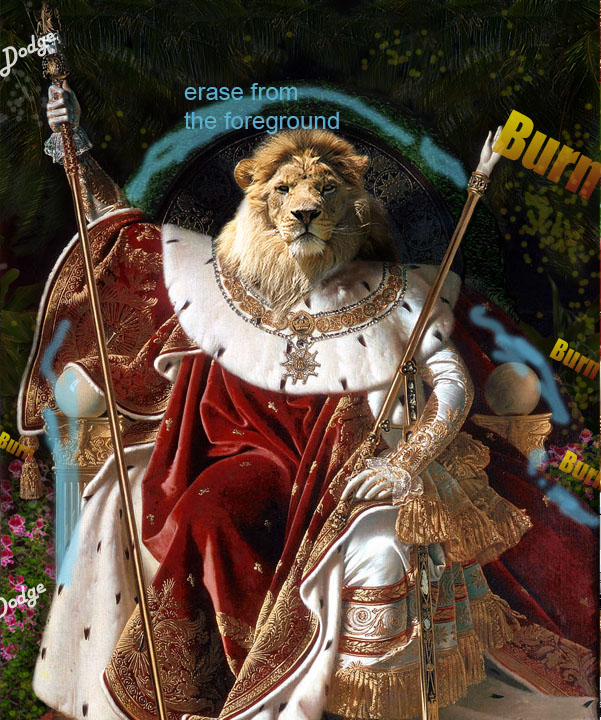
Use the Dodge & Burn tools to adjust the lighting of the lion head.
Then sharpen the image by using Filter >Sharpen > Sharpen to get the lions head the same sharpness as the background
A lions head is bigger than a human head so it will cause more of shadow on the body. The lion stock already has a prominent shadow with a clear path on it to follow. Use the Polygonal Lasso to select an area below the head where the shadow is likely to fall. Use a soft brush in the Eraser tool to erase parts of the shadow to make it more realistic. Set the layer to Soft Light and turn down the Opacity to 50%
Step 4: Making the throne more jungle
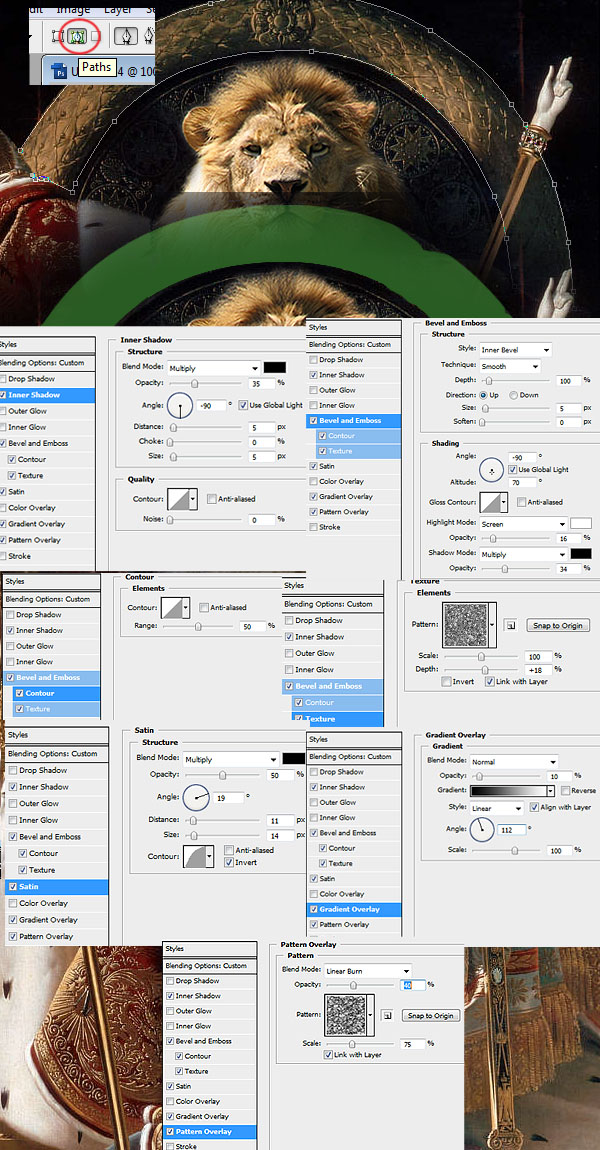
Create a new layer (Ctrl + Shift + N). Outline the edge of the throne using the Pen Tool (P) ( make sure the pen tool is in path mode). Right click on path and select make selection…and fill selection with a green colour. Use the eraser to get rid of areas of green which are blocking objects which would be infront of the throne. Set layer to Color mode.
Right click the above layer and select blending options. The settings used are in the image below. The patterns used are photoshop defaults under the texture fill category.
Step 5: Add vegetation on the throne
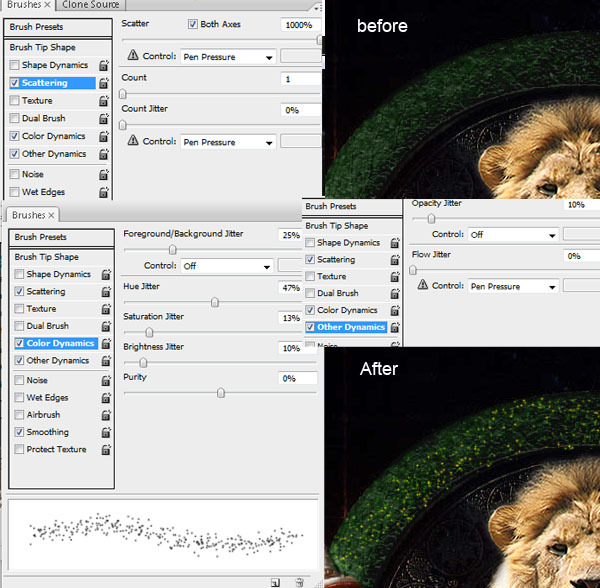
We are going to add more vegetation around the throne to make it look more jungle. Firstly add some flowers to the greenery on the throne to make it look more regal. To do this select select the greenry byCtrl + left click on the layer containing it. On a new layer brush on some flowers using a 3px round brush on 30% opacity to brush in the flowers, the brush settings are shown below. Play around with the colour and opacity of the brush to get different shades of flowers.
Step 6: Add vegetation around the the throne
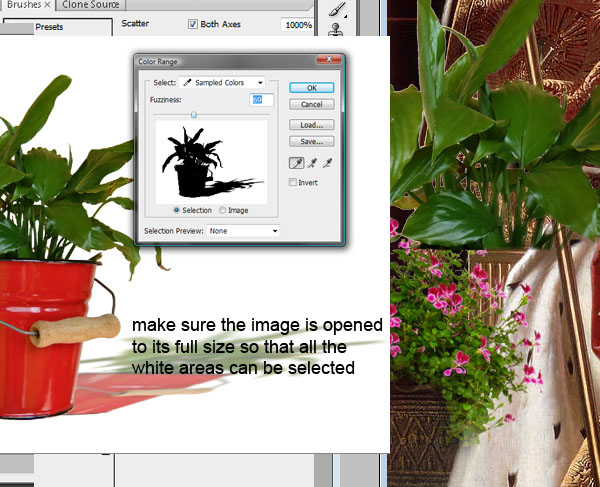
Open the image “Potted Plant"in a new document. Use select > colour range to select the white in the image. Adjust the fuzziness so that as much white is selected without much of the plant being selected. Ctrl + Shift + I to selected inverse. Add a layer mask, this will mask out the white part of the image. The pot part of the image is not needed so using a black brush on the layer mask hide the pot and the shadow of the plant. Then drag the layer into the main document and resize it using Free Transform (Ctrl +T),
If there is a white line around the leaves select the layer mask (Ctrl + left click ), select inverse (Ctrl + Shift + I) and feather (Ctrl + Alt + D) by 2 pixels. Delete this selection to get rid of any excess white lines around the leaves.
Repeat the above steps with the “Potted Flower" and the "Palm" stock.
Step 7: Arranging and blending the vegetation
The palm leaves are going to be above the throne while flowers are going to rest at the feet of the throne with the leafy plant standing behind the flowers. Arrange the plants into their respective positions making sure the flower layer is above the plant layer.
Duplicate the layers with the vegetation to build up the thickness of the vegetation. Use the black brush on the layer mask as needed to make sure the duplicates blend well with the originals.
After achieving the right thickness and distribution of the different vegetation merge all layers of the same type of vegetation for ease of use. This can be done by selecting all the layers using Ctrl + Left Click and right clicking on the layer and selecting Merge layers.
Play around with Image > Adjustments > Hue/Saturation to make the colours of the vegetation blend a bit more. The leafy plant and the palm leaves will need to be desaturated slighty as well as made a little darker as they are more in the background of the image.
Erase parts of the vegetation that are blocking objects that would be infront of them in the image.
Use the Dodge & Burn tools to adjust the lighting of the vegetation.
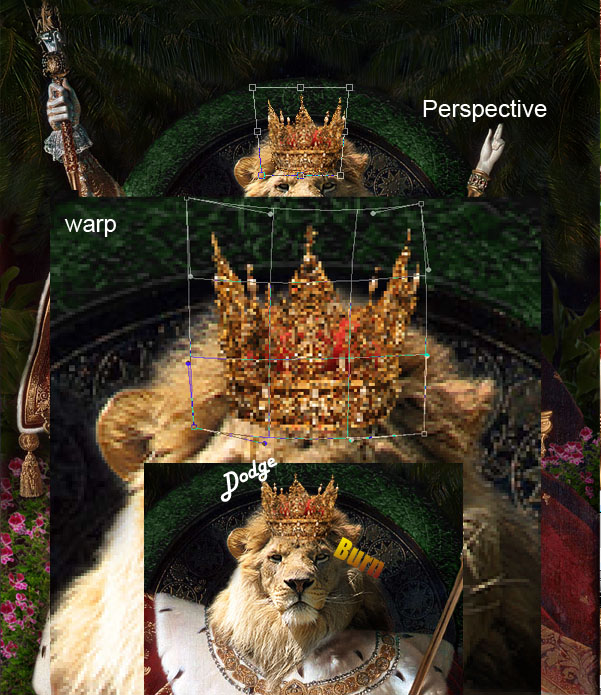
Step 8: Add a Crown
Theres no king without a crown. Import the "Crown" image to a layer above the lions head and using the Pen Tool (P) select the black area and get rid of it. Using the Free Transform (Ctrl +T) resize the crown to an appropriate size.
Make the crown fit the lions head using the Perspective (Edit > Transform > Perspective) and Warp (Edit > Transform > Warp) Tools
Use the Dodge & Burn tools to adjust the lighting of the crown.
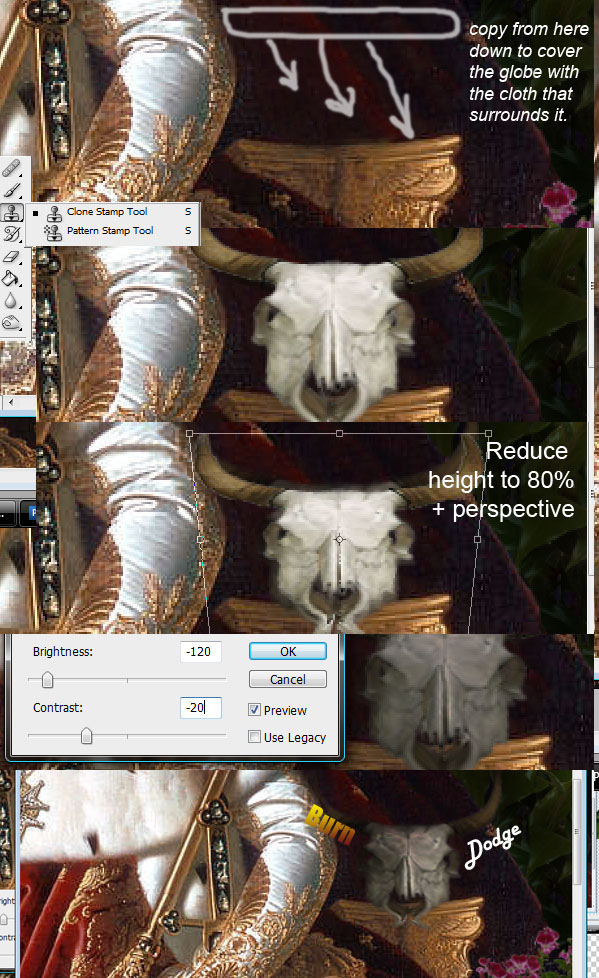
Step 9: Add some skulls
As the King the lion is dominant over man and beast and to symbolise this we are going to add the skull of a man and the skull of an animal either side of the throne. A cow’s skull will be placed on the golden pedestal on the lions left. Cover the globe that is there with the surrounding red cloth using the Clone Stamp Tool.
Import the "Cow Skull." Remove the white background of the skull using the Pen Tool (P) and use theFree Transform (Ctrl +T) to resize the skull to an appropriate size.
Make the skull fit on the pedestal using the Perspective (Edit > Transform > Perspective) & Warp (Edit > Transform > Warp)Tools
Using Image>Adjustments >Brightness/Contrast… reduce the brightness and the contrast of the skull.
Use the Dodge & Burn tools to adjust the lighting of the skull
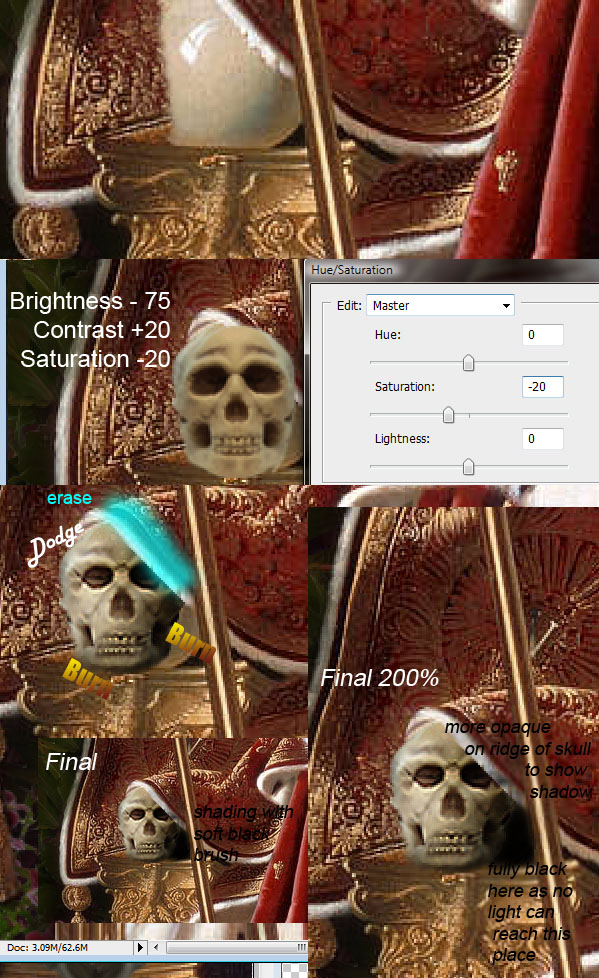
Step 10: Add the human skull.
A human skull will be placed on the golden pedestal on the lions right. The globe only needs to be partially covered as globe can be used as reference for the lighting on the skull. Cover the edge of the globe surrounding red cloak using the Clone Stamp Tool. Cover only part of globe that the skull wouldn’t be infront of.
Import the "Human Skull" image. Remove the white background of the skull using the Pen Tool (P). Use the Free Transform (Ctrl +T) to resize the skull to an appropriate size .
Make the skull fit the pedestal using the Perspective (Edit > Transform > Perspective) & Warp (Edit > Transform > Warp)Tools just like in the previous step
Using Image>Adjustments >Brightness/Contrast… reduce the brightness and but increase contrast of the skull. And using Image>Adjustments >Hue/Saturation reduce some saturation of the skull.
Use the Dodge & Burn tools to adjust the lighting of the skull
Use a soft black brush of low opacity to shade the edge of the cloak and to make the skulls shadow.
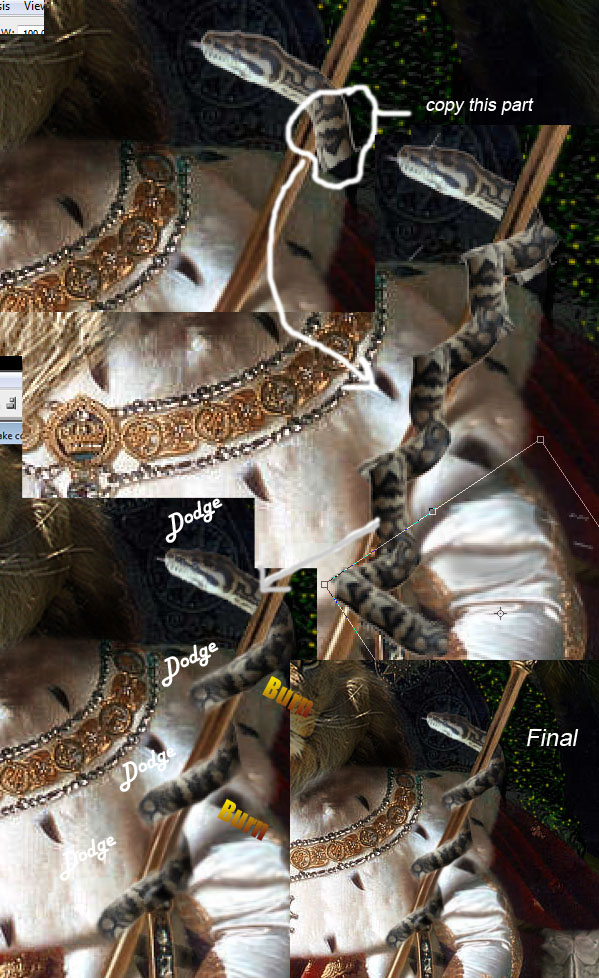
Step 11: Add an advisor for the king.
Import the "Snake" image.
Remove the white background of the snake using the Pen Tool (P). Use the Free Transform (Ctrl +T)to resize the skull to an appropriate size . The intention is to make the snake twirl around the lions cane.
Copy and paste the straight part of the snake on to a new layer. Arrange it using the Free Transform(Ctrl +T) to move it and rotate it so that the snake starts to look as if it is wrapped around the cane. Duplicate the straight part of the snake till the snake starts to look as if it is wrapped around the length of the cane and is dissapearing into the kings cloak.
Use a soft round eraser to smooth the harsh edges of the duplicate so that the parts of the snake starts blending into each other.
Once all the different duplicates are blended together merge them into a single layer.
Using the eraser remove parts of the snake which would be behind the cane.
Use the Dodge & Burn tools to adjust the lighting of the snake.
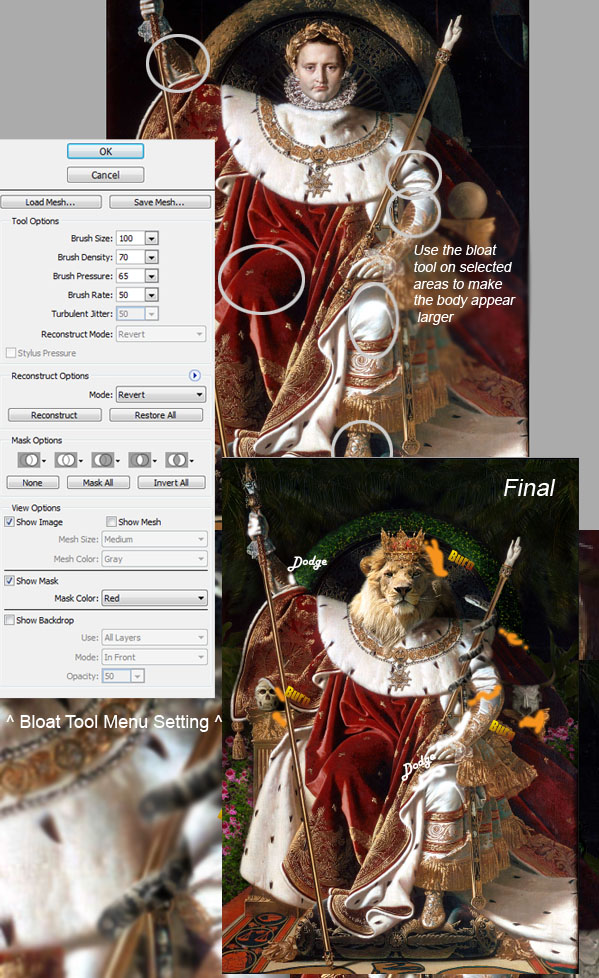
Step 12: Adjusting the base image
Lions are thought of as being very strong animals so we are going to make the body parts of the king larger. For this we will be editing the intial layer (make sure to duplicate the first layer as an insurance). Use the Bloat Tool (B) in the Liquidify Filter (Shift + Ctrl + X) on the intial layer to make the large muscle areas of the body even larger.
Use Dodge & Burn to even out the lighting on the base layer.
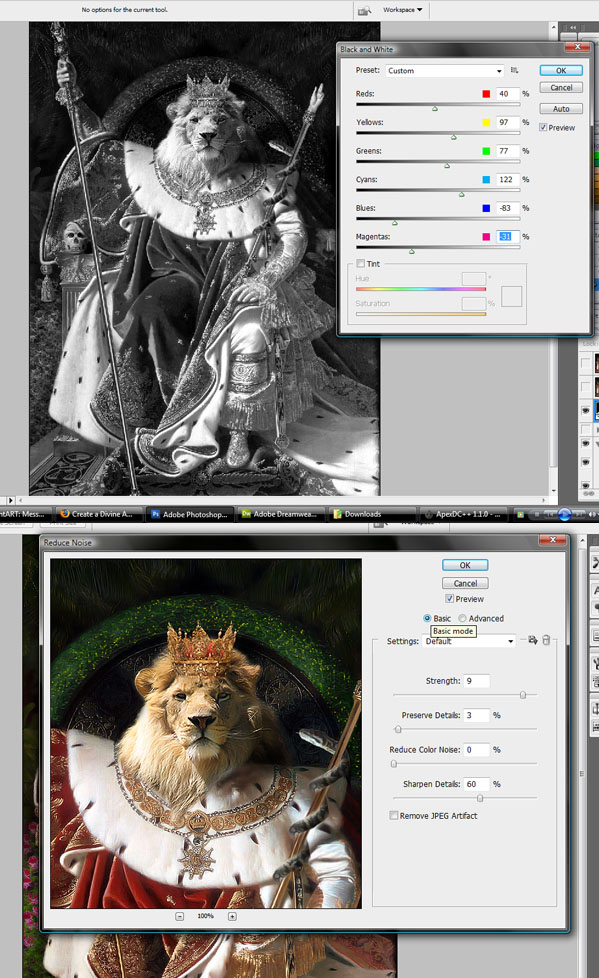
Step 13: Overall adjustments
Select the uppermost layer and then create a new Adjustment Layer by Layer >New Adjustment Layer > Black & White. Play around with the dials for the different colours until the black and white preview is balanced brightness wise. then set the adjustment layer to Luminosity and the Opacity to50%
Create a new layer above the adjustment layer (Shift + Ctrl + N). Do Ctrl + A to select all the canvas and (Shift + Ctrl + C) to copy merged. Paste this into the new layer you have created using Ctrl + V.
As the final step use the Reduce Noise Filter (Filter > Noise > Reduce Noise) on the copy merged layer to make the image smoother and more like a painting. Play around with the settings to get the feeling that you desire but make sure the Strength is very high (7-9) and the Preserve Details very low (1-10%)
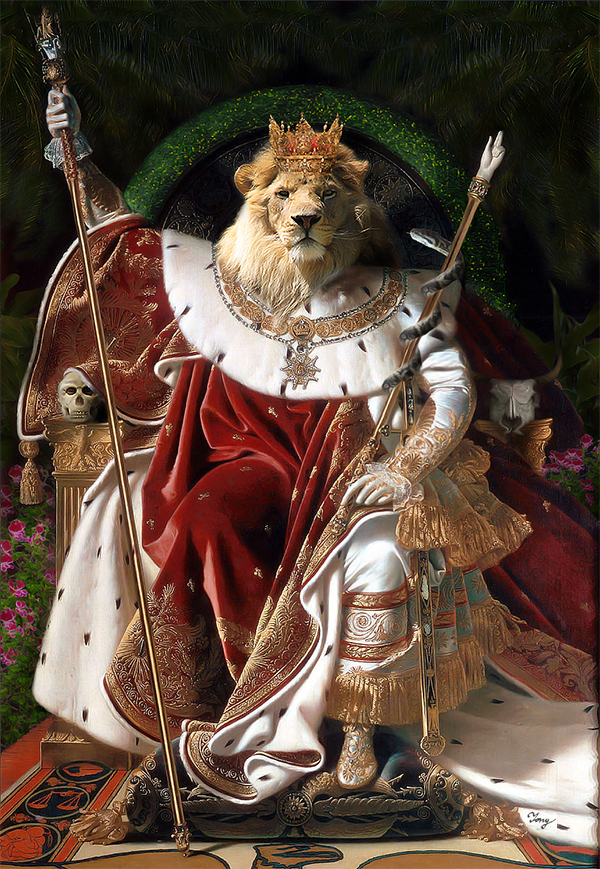
Final Result
 Download Psd File
You can leave a response, or trackback from your own site.
0 Response to "Creative Photoshop Animal King Photo Manipulation Tutorial"
Enregistrer un commentaire