Photoshop Text Effects : Easy Plastic Text with Layer Styles ( Tutorial )
 10:02
10:02
 hatizix
Written By Steve Patterson
Let's get started.
Step 1: Open A New Photoshop Document
The first thing we need to do is open a new document, so let's do that quickly using the keyboard shortcut, Ctrl+N (Win) /Command+N (Mac). This brings up Photoshop's New Document dialog box. Choose whichever size you like. I'm going to use the preset size of 640x480, as circled below:

Adobe Photoshop Text Effects: Create a new Photoshop document.
Step 2: Fill The Document With Black
Press the letter D on your keyboard to reset your Foreground and Background colors, so black becomes your Foreground color andwhite becomes your Background color. Then use the keyboard shortcut Alt+Backspace (Win) / Option+Delete (Mac) to fill your new document with the Foreground color, which in this case is black:

Adobe Photoshop Text Effects: Press "Alt+Backspace" (Win) / "Option+Delete" (Mac) to fill the new document with black.
Step 3: Add Your Text To The Document
Grab your Type tool from the Tools palette, or press T to quickly access it with the keyboard shortcut:

Adobe Photoshop Text Effects: Select the Type tool from Photoshop's Tools palette.
Then, with the Type tool selected, go up to the Options Bar at the top of the screen and select your font. I'm going to use Helvetica Rounded Black for mine. You can choose whichever font you like from the ones you have installed on your system. A larger, thicker font tends to work best for this effect:

Adobe Photoshop Text Effects: Choose your font in the Options Bar.
Press the letter X on your keyboard to swap your Foreground and Background colors, so white becomes your Foreground color. We're going to choose a better color for our text using Layer Styles, but for now, white will do just fine. Then, with your font chosen and white as your Foreground color, click inside your document and add your text. I'm going to type the word "plastic":

Adobe Photoshop Text Effects: Click inside your Photoshop document and add your text.
Resize your text as needed using Photoshop's Free Transform command by pressing Ctrl+T (Win) / Comand+T (Mac), which brings up the Free Transform box and handles around your text. Hold down Shift to constrain your text's proportions and drag any of the corner handles to resize the text. Hold down Alt (Win) / Option (Mac) as well as you drag to force the text to resize from its center point. Press Enter (Win) / Return (Mac) when you're happy with the size of your text to accept the change.
Step 4: Choose A Color For Your Text Using The "Color Overlay" Layer Style
Now that we have our text added to the document, we're going to start creating our "plastic" effect, and the first thing we're going to do is choose a better color for it. With the text layer selected, click on the Layer Styles icon at the bottom of the Layers palette:
Adobe Photoshop Text Effects: Click on the "Layer Styles" icon at the bottom of the Layers palette.
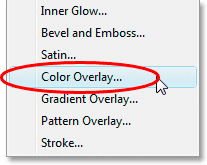
Choose Color Overlay from the list of Layer Styles that appears:

Adobe Photoshop Text Effects: Choose the "Color Overlay" Layer Style.
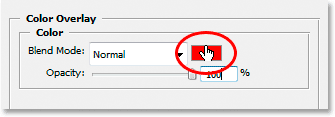
This brings up the Layer Style dialog box set to the "Color Overlay" options in the middle column. Click on the color swatch to the right of the "Blend Mode" options to choose a new color for your text:

Adobe Photoshop Text Effects: Click on the color swatch to choose a new color for the text.
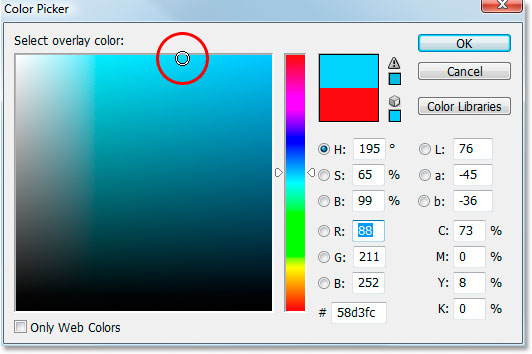
This brings up Photoshop's Color Picker. I'm going to choose a light blue for my text color. Feel free to choose whichever color you prefer, but try to pick a lighter shade of the color:

Adobe Photoshop Text Effects: Choose a color for your text using Photoshop's Color Picker.
Click OK when you've chosen your color to exit out of the Color Picker. Your text will now appear in your chosen color in the document:

Adobe Photoshop Text Effects: The text now appears in the color you chose.
I should note that we haven't really changed the color of the text here, even though it's now appearing in a different color. Technically, the text is still white. We've simply overlayed a new color onto it using the Color Overlay layer style. If we were to turn off the layer styles, which we won't but if we did, the text would appear white once again.
Step 5: Add An Inner Shadow To The Text Using The "Inner Glow" Layer Style
Next, we're going to give our text more of a three-dimensional look by adding an inner shadow. Now, there is an actual "Inner Shadow" layer style, but we're not going to use it because it's limited to giving us a directional shadow. We want the text to appear to be surrounded by the shadow, so instead of using the ready-made inner shadow that Photoshop gives us, we're going to create our own Inner Shadow layer style by converting the Inner Glow style into a shadow.
To do that, click on the words Inner Glow in the list of Layer Styles on the left of the Layer Style dialog box. Make sure you click directly on the words. Don't simply click inside the checkbox because all that will do is turn on the effect. We want access to the effect's options, and for that, you need to click on the name itself:

Adobe Photoshop Text Effects: Click on the words "Inner Glow" on the left of the Layer Style dialog box.
The middle column of the Layer Style dialog box will change to show the "Inner Glow" options:

Adobe Photoshop Text Effects: The "Inner Glow" options in the Layer Style dialog box.
In order to change the "inner glow" to an "inner shadow", all we need to do is change the Blend Mode at the top. Click on the down-pointing arrow to the right of the word "Screen" and change the blend mode to Multiply. Our glow is now a shadow, or at least it will be a shadow once we select a darker color for it. The default yellow won't work very well as a shadow, so click on the color swatchdirectly below the word "Noise", which will bring Photoshop's Color Picker back up, and choose a much darker version of the color you chose for the text. I chose light blue for my text, so I'll choose a dark blue for the shadow. Lower the Opacity of the shadow to around 50% so it's not as intense. Make sure Edge is selected for the Source, and finally, increase the Size of the shadow to about13 pixels.
Your text will now look something like this:

Adobe Photoshop Text Effects: The text after applying the inner shadow.
Step 6: Apply The "Bevel and Emboss" Layer Style
Next, we're going to add a "Bevel and Emboss" effect to our text, so click directly on the words Bevel and Emboss in the list of Layer Styles on the left of the Layer Style dialog box. Again, make sure you click directly on the words and don't just click inside the checkbox:

Adobe Photoshop Text Effects: Click on the words "Bevel and Emboss" on the left of the Layer Style dialog box.
The middle column of the Layer Style dialog box will change to the Bevel and Emboss options. The first thing we want to do here is load a new "Gloss Contour", so go down to where it says "Gloss Contour" in the "Shading" options and click on the down-pointing arrow to the right of the contour preview thumbnail:

Adobe Photoshop Text Effects: Click on the down-pointing arrow to the right of the contour preview thumbnail.
Then click on the right-pointing arrow in the top right corner of the contour selection box that pops up:

Adobe Photoshop Text Effects: Click on the right-pointing arrow in the top right corner of the contour selection box.
Then select Contours at the bottom of the list that appears to load a new set of contours which are not available to us by default:

Adobe Photoshop Text Effects: Select "Contours" to load a new set of contours.
Photoshop will ask you if you want to replace the original contours with these new ones or simply add the new ones to the bottom of the list. Click on Append:

Adobe Photoshop Text Effects: Click "Append" to add the new contours to the bottom of the original ones.
You'll see the new contours added to the bottom of the originals. To make things simpler for us, rather than me trying to describe the shape of the contour to click on, click once again on that right-pointing arrow in the top right corner and select Large List from the options so we can see both a thumbnail preview of the contour and the name of the contour beside each thumbnail:

Adobe Photoshop Text Effects: Select "Large List" from the options to see both the contour preview thumbnails and the names of each contour.
Now that we can see the actual names of each contour, scroll down the list until you come to the one named Ring-Triple and double-click on it to select it:

Adobe Photoshop Text Effects: Double-click on the "Ring-Triple" contour to select it.
With the "Ring-Triple" contour selected, let's change the rest of the Bevel and Emboss options:

Adobe Photoshop Text Effects: Change the Bevel and Emboss options circled in red.
These are the settings I used for my text. You may need to change them slightly depending on the font you're using and the size of your text. Starting from the top and working our way down, increase the Depth to around 131% and the Size to around 18 pixels. In the "Shading" options, set the Angle to 120° if it isn't already, and set the Altitude to 60°. Make sure Anti-aliased is checkedbeside the contour preview thumbnail. Increase the Highlight Mode Opacity all the way to 100%, and finally, lower the Shadow Mode Opacity down to 0%.
Your text should now look something like this:

Adobe Photoshop Text Effects: The text after applying the Bevel and Emboss layer style.
Step 7: Apply The "Contour" Layer Style
Click on the word Contour on the left of the Layer Style dialog box. It's directly below the words "Bevel and Emboss":

Adobe Photoshop Text Effects: Click on the word "Contour" on the left of the Layer Style dialog box.
The middle column of the Layer Style dialog box will change to the Contour options. We're going to use another contour from the ones we loaded in a moment ago. Click on the down-pointing arrow to the right of the contour preview thumbnail:

Adobe Photoshop Text Effects: Click on the down-pointing arrow to the right of the contour preview thumbnail.
This time, scroll down the list until you come to the one named Shallow Slope-Valley. Double-click on it to select it:

Adobe Photoshop Text Effects: Scroll down the list to the "Shallow Slope-Valley" contour and double-click to select it.
You can fine-tune the "shiny" effect to your liking by dragging the Range slider left or right until you're happy with the results. I'm to drag mine to the right and increase the Range to about 85%:

Adobe Photoshop Text Effects: Fine-tune the effect by adjusting the "Range" value.
Here's my text after adding the Contour layer style:

Adobe Photoshop Text Effects: The text after applying the Contour layer style.
Click OK to exit out of the Layer Style dialog box for now.
Step 8: Duplicate The Text Layer
Press Ctrl+J (Win) / Command+J (Mac) to duplicate the text layer, so you'll now have two text layers in the Layers palette:

Adobe Photoshop Text Effects: Duplicate the text layer.
Then click on the original text layer in the Layers palette to select it, so we're working once again on the original, not the duplicate text layer above it:

Adobe Photoshop Text Effects: Click on the original text layer to select it once again.
Step 9: Add A Stroke To The Text
With the original text layer re-selected, click once again on the Layer Style icon at the bottom of the Layers palette and this time, select Stroke at the bottom of the list:

Adobe Photoshop Text Effects: Select "Stroke" from the list of Layer Styles.
The Layer Style dialog box pops back up, with the Stroke options in the middle column. First, increase the stroke Size to about 6 pixels:

Adobe Photoshop Text Effects: Drag the slider bar to increase the stroke size.
Then click on the stroke's color swatch to choose a new color for the stroke:

Adobe Photoshop Text Effects: Click on the color swatch in the Stroke options.
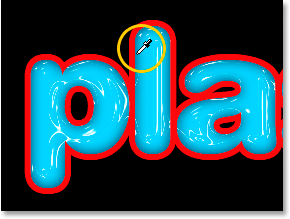
Photoshop's Color Picker pops back up. Rather than choosing a color directly in the Color Picker, move your mouse over the text. You'll see your mouse cursor change into the Eyedropper icon. Click near the edge of one of the letters to sample a shade of the color that's about midway between the lightest and darkest colors in the text:

Adobe Photoshop Text Effects: Sample a color from the text that's about midway between the lightest and darkest text colors.
Click OK to exit out of the Color Picker when you're done.
Step 10: Apply The "Bevel and Emboss" Style To The Stroke
Switch back to the "Bevel and Emboss" options by clicking on the words Bevel and Emboss on the left of the Layer Style dialog box:

Adobe Photoshop Text Effects: Click on the words "Bevel and Emboss" to access the Bevel and Emboss options once again.
The Layer Style dialog box will change to show the Bevel and Emboss options once again in the middle column. We want to apply the Bevel and Emboss style to the stroke itself, so to do that, click on the down-pointing arrow to the right of the words "Inner Bevel" and change the Style to Stroke Emboss:

Adobe Photoshop Text Effects: Change the Bevel and Emboss "Style" to "Stroke Emboss".
We're almost done. Go back down to the "Gloss Contour" option and once again click on the down-pointing arrow to the right of the contour preview thumbnail. This time, scroll down the list until you come to the one named Shallow Slope-Valley. Double-click on it to select it:

Adobe Photoshop Text Effects: Scroll down the list to the "Shallow Slope-Valley" contour and double-click to select it.
While you're down at the bottom of the Bevel and Emboss options, increase the Shadow Mode Opacity to about 40%:

Adobe Photoshop Text Effects: Increase the Shadow Mode Opacity to 40%.
Finally, go back up to the top and lower the Depth value to about 41%, then increase the Size by dragging the slider bar to the right until you can see the letter strokes merging together. I've increased mine to 24 pixels.
Click OK when you're happy with the results to exit out of the Layer Style dialog box, and, you're done!
Here is the final "plastic text" effect:

Adobe Photoshop Text Effects: The final result.
You can leave a response, or trackback from your own site.


0 Response to "Photoshop Text Effects : Easy Plastic Text with Layer Styles ( Tutorial )"
Enregistrer un commentaire